More Framing Stuff
As well as making my own frames, I also make my own molding. It is a little more time consuming but it saves a lot of money. I have also found out that no matter how I frame a piece, half of the time I am asked how much the painting is without the frame. Since I am now making standard size panels, it is easier for me to pull a frame off and be able to reuse it.
I like frames that have a clean and simple look. There was a particular molding that was made back in the 1960’s, that I liked a lot, but I just can’t find it anymore. I also like frames that give a floating look to the painting. Floater styles frames are making a comeback but they are still too expense for my taste. I priced one out from a molding catalogue the other day. For an 18 X 24 frame it would’ve cost about $36.00 plus shipping. Making it myself, the wood costs me $4.50. Adding the glue, nails and paint brings it up to about $6.50 plus my time.
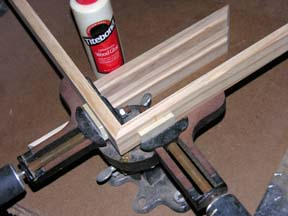
For this frame I used a piece of 1” X 2” clear pine. I then cut the rabbet out; you can see this in the small sample piece that is with the primed frame. To set up my table saw and do this takes me about 15 minutes. Usually I’ll run about 6 lengths at once, just to save time. The most time is spent in the set-up. Next I’ll cut the rails to size. I have a chop saw for this. That being done I glue up the corners and let them sit in my framer’s vices until dry. If the frame is going to be painted I’ll use a brad nailer on the corners. If the frame is going to have a natural finish, I use a bottom pinner. Next I’ll sand the assembled frame and then either give it an oil finish or prime it for painting. I’ll usually give it 2 coats of primer or 3 coats of an oil finish.
After I let the primer dry overnight I’ll spray paint the top with a metallic gold paint, using 2-3 coats, and let that dry overnight. I’ll then use a delicate surface painters tape and mask off the gold and burnish it down. I will then spray the inside rabbet and sides of the frame with a satin finish black paint using 3 light coats letting it dry in between so that I don’t get any running. When it’s dry, I’ll drop the painting in and secure it from the back.
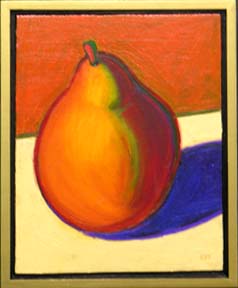
After that it’s just a matter of putting on the hanging wire and bumpers. The painting has my initials on the front. On the back, with a sharpie marker, I write the title, below that I add the copyright symbol and print my name and the date, and below that I use my signature. I also take some double stick tape and affix my business card to the back. If the piece is matted and has glass I will also put a dust seal on the back. For oils on panel, I just leave it.
This painting is oil on a hardwood panel that has been cradled. It measures 14” X 11” and I just finished it last week. It has the highly creative title (I hate naming paintings) of Pear With Sienna Background.
posted by Ed Maskevich at 8:04 PM
![]()


3 Comments:
Nice to see your process, Ed, and your energy amazes me. I get a headache just thinking about how much work making a frame and molding is. Your frames look great and seem appropriate to your work.
I hate naming paintings too.
A lot of it ends up being "hurry up and wait" Glue the corners together, need to wait for the glue to dry, back to my painting. Apply the primer/finish coat, wait for it to dry, back to my painting. It actually ends up being a nice break from the paintings. For me it sort of becomes meditative and a chance to refresh my brain.
Multi-tasking! I do that while I paint too. Except instead of making frames I do laundry or scoop the cat litter or make cookies. Practically the same thing :-)
Post a Comment
<< Home